> ## Documentation Index
> Fetch the complete documentation index at: https://docs.cloudmcp.run/llms.txt
> Use this file to discover all available pages before exploring further.
# Deploy Remote MCP Servers from NPM, PyPI, or GitHub with Custom Deployments
> Learn how to deploy any MCP server from NPM, PyPI, or GitHub using CloudMCP's new custom deployment feature. Support for private packages, real-time validation, and multiple package managers.
# Deploy Any MCP Server with CloudMCP's Custom Deployment Feature
CloudMCP now lets you deploy **any** MCP (Model Context Protocol) server, not just those in our curated registry. Whether your server is published on NPM, PyPI, or hosted on GitHub, you can deploy it with just a few clicks using our new custom deployment feature.
## Prerequisites
Before you begin, ensure you have:
* A cloudmcp.run account (sign up with GitHub at [cloudmcp.run](https://cloudmcp.run))
* The package name or GitHub URL of the MCP server you want to deploy
* Any required API keys or environment variables for your server
* (Coming Soon!) Authentication tokens for private packages
## What's New?
The custom deployment feature enables:
* **Universal package support**: Deploy from NPM, PyPI, or GitHub repositories
* **Private package deployment**: Use authentication tokens for private resources
* **Real-time validation**: Instant package verification as you type
* **Smart detection**: Automatic recognition of package vs repository inputs
* **Flexible configuration**: Full control over arguments and environment variables
## Step 1: Access Custom Deployment
Navigate to your CloudMCP dashboard and open the **Deployments** page. Scroll down to find the new "Custom Deployment" section.
 Click the **"Deploy Custom Server"** button to open the deployment configuration dialog.
## Step 2: Configure Your Package Manager
The custom deployment dialog opens with a clean interface for configuring your server.
Click the **"Deploy Custom Server"** button to open the deployment configuration dialog.
## Step 2: Configure Your Package Manager
The custom deployment dialog opens with a clean interface for configuring your server.
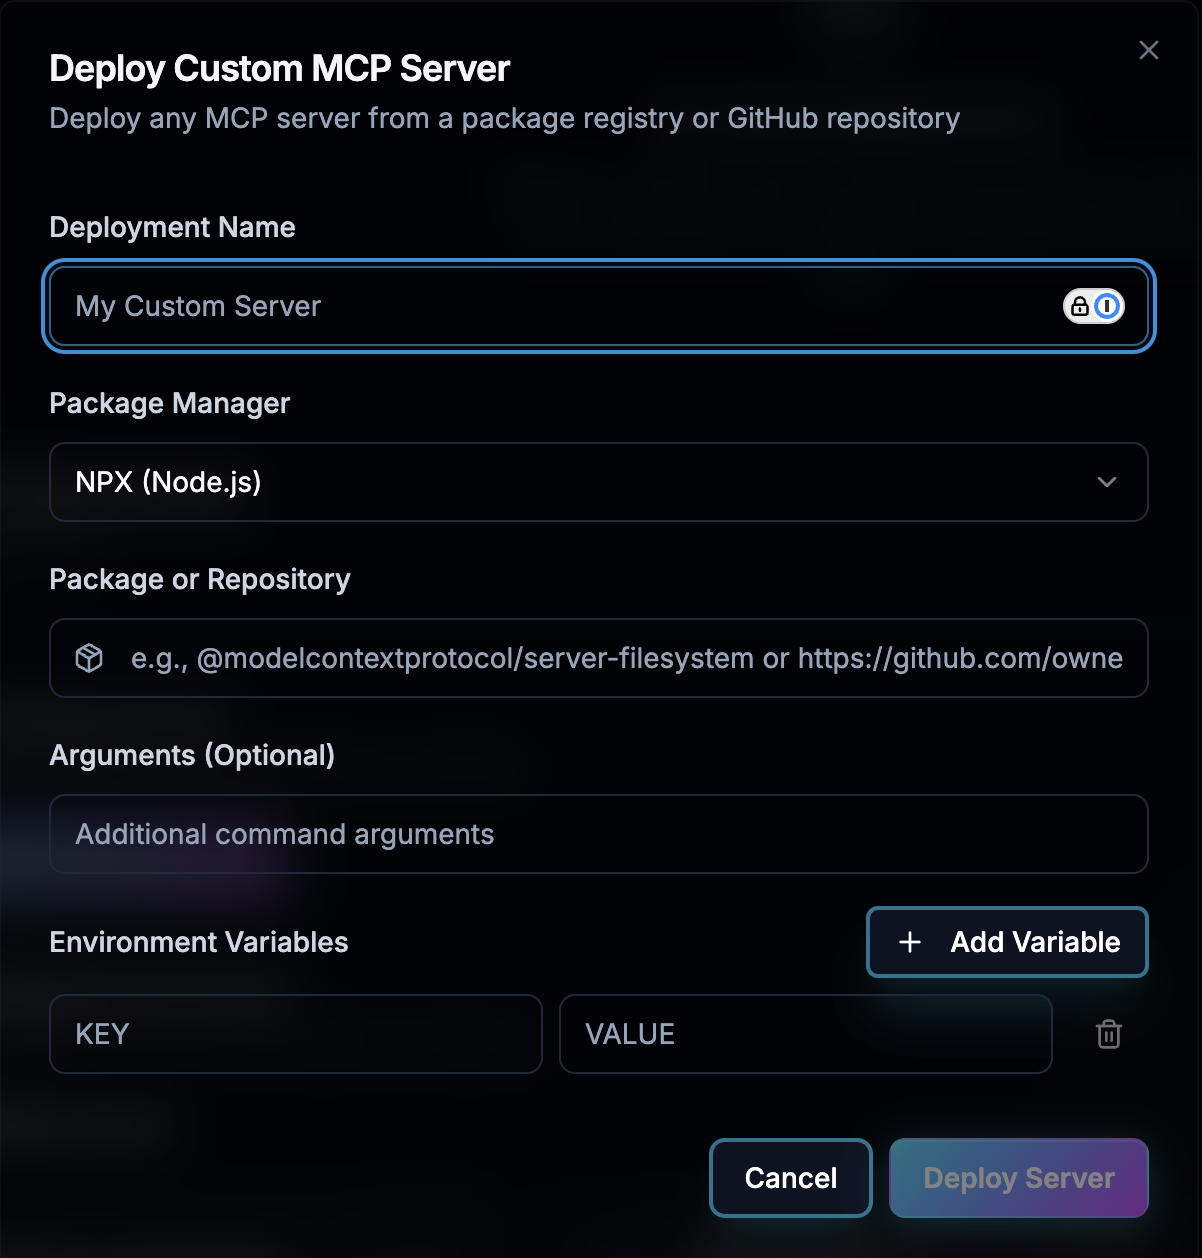 ### Select Your Package Manager
Choose from four popular package managers based on your server's language:
* **NPX** - For Node.js packages (most MCP servers)
* **UVX** - For Python packages using UV
* **PIPX** - For traditional Python packages
* **BUNX** - For Bun runtime packages
The package manager determines how CloudMCP will install and run your server.
## Step 3: Enter Your Package or Repository
### Smart Input Detection
CloudMCP automatically detects what type of resource you're entering:
### Select Your Package Manager
Choose from four popular package managers based on your server's language:
* **NPX** - For Node.js packages (most MCP servers)
* **UVX** - For Python packages using UV
* **PIPX** - For traditional Python packages
* **BUNX** - For Bun runtime packages
The package manager determines how CloudMCP will install and run your server.
## Step 3: Enter Your Package or Repository
### Smart Input Detection
CloudMCP automatically detects what type of resource you're entering:
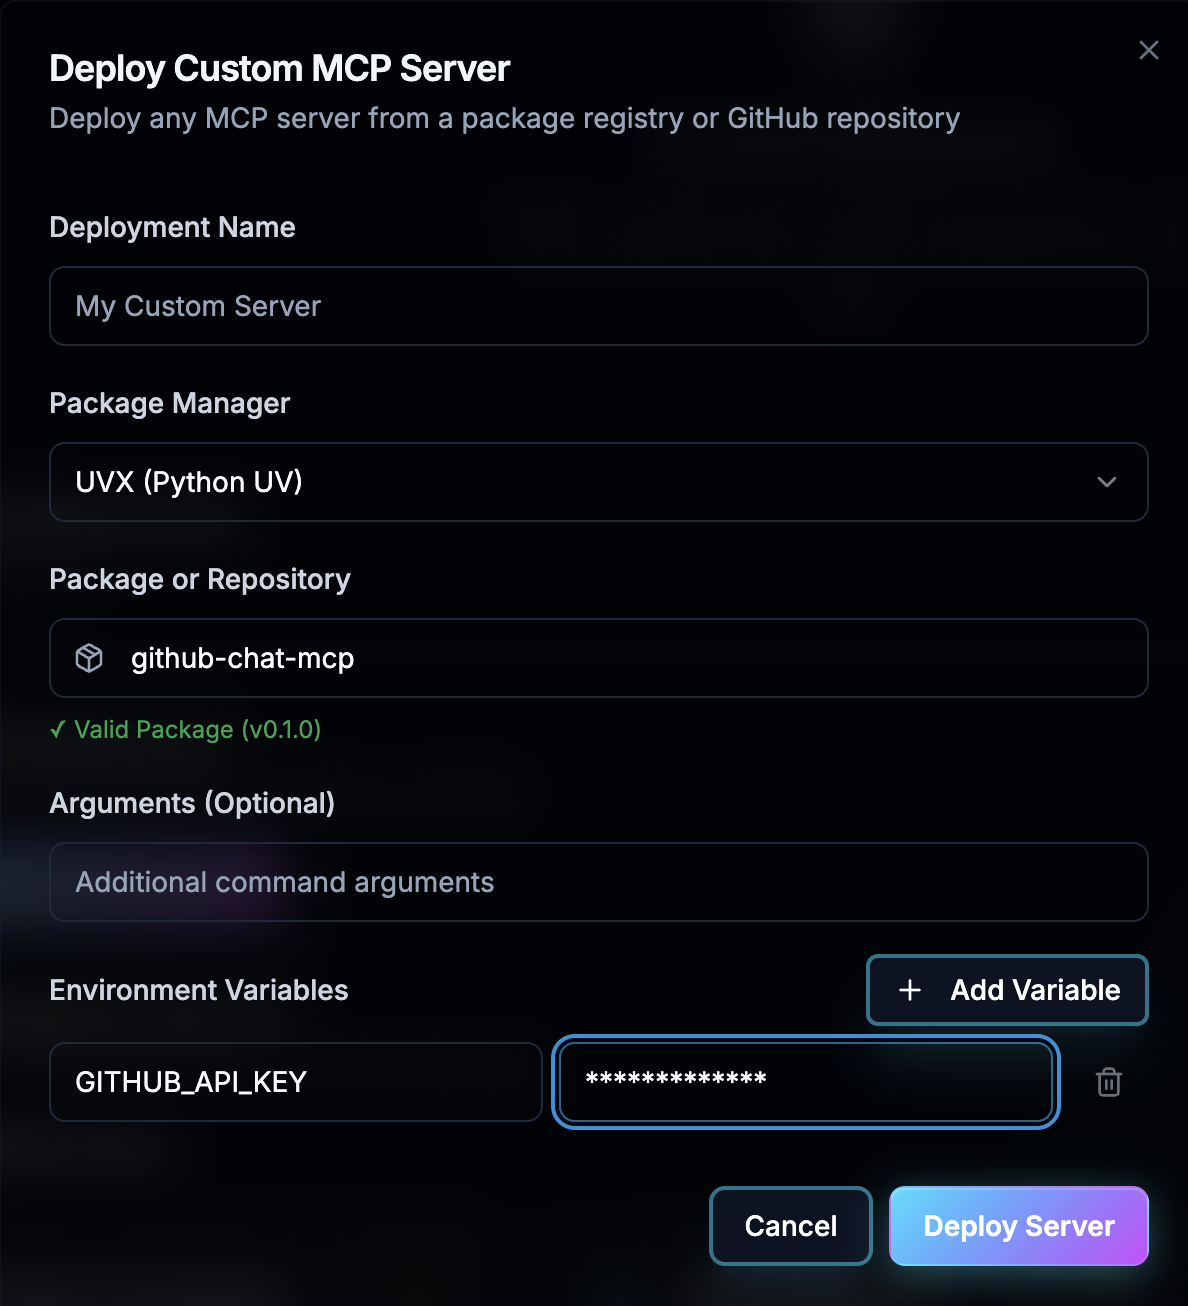 * **Package name**: Shows a package icon (📦)
* NPM: `@modelcontextprotocol/server-filesystem`
* PyPI: `mcp-server-sqlite`
* **GitHub repository**: Shows a GitHub icon (🐙)
* `https://github.com/owner/repo`
* `github.com/owner/repo`
### Real-time Validation
As you type, CloudMCP validates your input in real-time:
* **Package name**: Shows a package icon (📦)
* NPM: `@modelcontextprotocol/server-filesystem`
* PyPI: `mcp-server-sqlite`
* **GitHub repository**: Shows a GitHub icon (🐙)
* `https://github.com/owner/repo`
* `github.com/owner/repo`
### Real-time Validation
As you type, CloudMCP validates your input in real-time:
 The validation checks:
* Package exists in the selected registry
* Latest version available
* Whether authentication is required
* Package metadata and description
> 💡 **Tip**: The validation happens automatically after you stop typing for 500ms, preventing unnecessary API calls while you type.
## Step 5: Add Configuration
### Deployment Name
Give your deployment a descriptive name to identify it in your dashboard.
Good naming examples:
* `production-database-server`
* `dev-filesystem-access`
* `customer-api-integration`
### Command Arguments (Optional)
Add any additional command-line arguments your server needs:
The validation checks:
* Package exists in the selected registry
* Latest version available
* Whether authentication is required
* Package metadata and description
> 💡 **Tip**: The validation happens automatically after you stop typing for 500ms, preventing unnecessary API calls while you type.
## Step 5: Add Configuration
### Deployment Name
Give your deployment a descriptive name to identify it in your dashboard.
Good naming examples:
* `production-database-server`
* `dev-filesystem-access`
* `customer-api-integration`
### Command Arguments (Optional)
Add any additional command-line arguments your server needs:
 Common use cases:
* Specify configuration files: `--config /path/to/config.json`
* Set operation modes: `--mode production`
* Enable features: `--enable-feature-x`
### Environment Variables
Configure environment variables through the intuitive interface:
Common use cases:
* Specify configuration files: `--config /path/to/config.json`
* Set operation modes: `--mode production`
* Enable features: `--enable-feature-x`
### Environment Variables
Configure environment variables through the intuitive interface:
 To add variables:
1. Click **"Add Variable"**
2. Enter the key (e.g., `API_KEY`)
3. Enter the value
4. Add more as needed
5. Remove unwanted variables with the trash icon
> 🔒 **Security Tip**: CloudMCP blocks potentially dangerous environment variables like `LD_PRELOAD` and `NODE_OPTIONS` for security.
## Step 6: Deploy Your Server
Once everything is configured, click **"Deploy Server"** to launch your deployment.
CloudMCP will:
1. Create a dedicated instance for your server
2. Install the package from your selected registry
3. Apply all environment variables securely
4. Start the server with your specified arguments
5. Provide you with a unique endpoint URL
## Step 7: Monitor Your Deployment
After deployment, you'll see your custom server in the Active Deployments section:
To add variables:
1. Click **"Add Variable"**
2. Enter the key (e.g., `API_KEY`)
3. Enter the value
4. Add more as needed
5. Remove unwanted variables with the trash icon
> 🔒 **Security Tip**: CloudMCP blocks potentially dangerous environment variables like `LD_PRELOAD` and `NODE_OPTIONS` for security.
## Step 6: Deploy Your Server
Once everything is configured, click **"Deploy Server"** to launch your deployment.
CloudMCP will:
1. Create a dedicated instance for your server
2. Install the package from your selected registry
3. Apply all environment variables securely
4. Start the server with your specified arguments
5. Provide you with a unique endpoint URL
## Step 7: Monitor Your Deployment
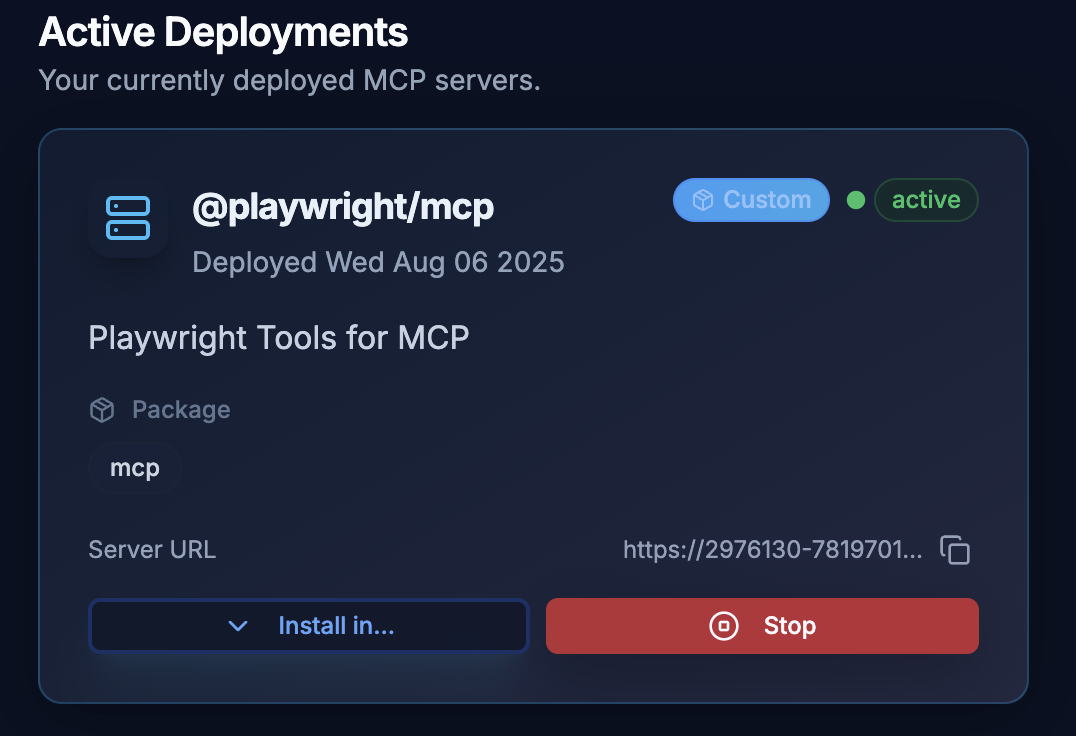
After deployment, you'll see your custom server in the Active Deployments section:
 ### Custom Deployment Indicators
Custom deployments are easy to identify:
* **"Custom" badge**: Distinguishes from registry servers
* **Package info**: Shows the exact package or repository deployed
* **Status indicator**: Real-time deployment status
* **Server URL**: Your unique endpoint for connecting
### Available Actions
* **Copy URL**: Get your server endpoint
* **Install in VSCode**: One-click VSCode integration
* **Stop**: Shut down when no longer needed
## Trial vs Paid Deployments
CloudMCP offers flexible deployment options:
### Trial Deployments
* **Duration**: 48 hours
* **Perfect for**: Testing and development
* **Limit**: Based on your account type
* **Automatic expiry**: Servers stop after 48 hours
### Paid Deployments
* **Duration**: Unlimited
* **Perfect for**: Production use
* **Resources**: Dedicated instances
* **Support**: Priority support included
## Best Practices
### 1. Validate Before Deploying
Let the real-time validation complete before clicking deploy. This catches issues early and saves time.
### 2. Use Descriptive Names
Help your future self by using clear, descriptive deployment names:
* ❌ `server1`
* ✅ `production-github-integration`
### 3. Secure Your Tokens
* Never share authentication tokens
* Rotate tokens regularly
* Use minimal required permissions
### 4. Test with Trials First
Use trial deployments to:
* Test server functionality
* Verify environment variables
* Check performance requirements
## Troubleshooting
### Validation Fails
**Package not found error:**
* Verify the package name spelling
* Check the package exists in the selected registry
* For GitHub, ensure the URL format is correct
**Version not available:**
* Check if the version exists
* Try using `latest` or no version
* For GitHub, verify the branch name
### Deployment Failures
**Environment variable errors:**
* Check for typos in variable names
* Verify required variables are set
* Ensure values don't contain invalid characters
**Resource limits:**
* Check your deployment quota
* [Upgrade](https://cloudmcp.run/pricing) plan if needed
* Delete unused deployments
### Connection Problems
**Can't connect to deployed server:**
* Verify the server started successfully
* [Redeploy](https://cloudmcp.run/dashboard/deployments) your server.
* Ensure your client supports the server's MCP version of the package.
* Send us a support
### Package Versions
Specify exact versions for stability:
```
NPM: @package/name@1.2.3
PyPI: package-name==1.2.3
```
### Multiple Configurations
Deploy the same server multiple times:
* Different environment variables for dev/prod
* Separate instances for different projects
* Isolated deployments for testing
### Monitoring Deployments
Track your custom deployments:
* Check status indicators regularly
* Monitor resource usage (coming soon)
* Set up alerts for failures (coming soon)
## What's Next?
Now that you've mastered custom deployments:
* 🚀 **Deploy your servers**: Start with your own MCP servers [--> Dashboard](https://cloudmcp.run/dashboard)
* 📦 **Try different registries**: Explore NPM, PyPI, and GitHub options
## Coming Soon
We're constantly improving custom deployments:
* **Deployment templates**: Save configurations for reuse
* **Bulk deployments**: Deploy multiple servers at once
* **Version management**: Easy updates and rollbacks
* **Performance metrics**: Detailed resource monitoring
## Need Help?
If you encounter any issues:
* Check our [blog](https://cloudmcp.run/blog) for updates and tutorials
* Join our [Discord community](https://discord.gg/cloudmcp)
* Contact me with the [support](https://cloudmcp.run/support) form!
***
*Ready to deploy your custom MCP server? [Start deploying →](https://cloudmcp.run/dashboard/deployments)*
### Custom Deployment Indicators
Custom deployments are easy to identify:
* **"Custom" badge**: Distinguishes from registry servers
* **Package info**: Shows the exact package or repository deployed
* **Status indicator**: Real-time deployment status
* **Server URL**: Your unique endpoint for connecting
### Available Actions
* **Copy URL**: Get your server endpoint
* **Install in VSCode**: One-click VSCode integration
* **Stop**: Shut down when no longer needed
## Trial vs Paid Deployments
CloudMCP offers flexible deployment options:
### Trial Deployments
* **Duration**: 48 hours
* **Perfect for**: Testing and development
* **Limit**: Based on your account type
* **Automatic expiry**: Servers stop after 48 hours
### Paid Deployments
* **Duration**: Unlimited
* **Perfect for**: Production use
* **Resources**: Dedicated instances
* **Support**: Priority support included
## Best Practices
### 1. Validate Before Deploying
Let the real-time validation complete before clicking deploy. This catches issues early and saves time.
### 2. Use Descriptive Names
Help your future self by using clear, descriptive deployment names:
* ❌ `server1`
* ✅ `production-github-integration`
### 3. Secure Your Tokens
* Never share authentication tokens
* Rotate tokens regularly
* Use minimal required permissions
### 4. Test with Trials First
Use trial deployments to:
* Test server functionality
* Verify environment variables
* Check performance requirements
## Troubleshooting
### Validation Fails
**Package not found error:**
* Verify the package name spelling
* Check the package exists in the selected registry
* For GitHub, ensure the URL format is correct
**Version not available:**
* Check if the version exists
* Try using `latest` or no version
* For GitHub, verify the branch name
### Deployment Failures
**Environment variable errors:**
* Check for typos in variable names
* Verify required variables are set
* Ensure values don't contain invalid characters
**Resource limits:**
* Check your deployment quota
* [Upgrade](https://cloudmcp.run/pricing) plan if needed
* Delete unused deployments
### Connection Problems
**Can't connect to deployed server:**
* Verify the server started successfully
* [Redeploy](https://cloudmcp.run/dashboard/deployments) your server.
* Ensure your client supports the server's MCP version of the package.
* Send us a support
### Package Versions
Specify exact versions for stability:
```
NPM: @package/name@1.2.3
PyPI: package-name==1.2.3
```
### Multiple Configurations
Deploy the same server multiple times:
* Different environment variables for dev/prod
* Separate instances for different projects
* Isolated deployments for testing
### Monitoring Deployments
Track your custom deployments:
* Check status indicators regularly
* Monitor resource usage (coming soon)
* Set up alerts for failures (coming soon)
## What's Next?
Now that you've mastered custom deployments:
* 🚀 **Deploy your servers**: Start with your own MCP servers [--> Dashboard](https://cloudmcp.run/dashboard)
* 📦 **Try different registries**: Explore NPM, PyPI, and GitHub options
## Coming Soon
We're constantly improving custom deployments:
* **Deployment templates**: Save configurations for reuse
* **Bulk deployments**: Deploy multiple servers at once
* **Version management**: Easy updates and rollbacks
* **Performance metrics**: Detailed resource monitoring
## Need Help?
If you encounter any issues:
* Check our [blog](https://cloudmcp.run/blog) for updates and tutorials
* Join our [Discord community](https://discord.gg/cloudmcp)
* Contact me with the [support](https://cloudmcp.run/support) form!
***
*Ready to deploy your custom MCP server? [Start deploying →](https://cloudmcp.run/dashboard/deployments)*